Our local radio station has had a chocolate breakfast for the last 6 years. It is from 5-9 AM!! I think I have been to 5 of them. My friends couldn't go this year so I decided to go by myself. Well this morning I woke up at 4 am and thought, I don't need that much chocolate, I don't want to get up this early, I won't waste the gas to go, etc. But common sense kicked in and said "It's once a year, what are you thinking? of course you'll go!!!" So I took my darling husband to work and went on to the chocolate breakfast. I arrived at 6:10, waited in line for about 35 min and had my first taste of many chocolate items by 6:45. There were 34 vendors there, all with samples of their wares-ice cream, cookies, cake, popcorn, candy, jelly, coffee, wine and more I'm sure. I don't drink wine or coffee, so I skipped those booths. By the end, I couldn't stuff my mouth fast enough, so I have a few goodies for later. I took pics, but only with my phone and I don't have a card yet to post them. They had Richie Lee-a 50's band/group there singing. He had a red sports coat and red shoes! And a really good voice, very enjoyable way to wait in line. Of course, I've never met a stranger, so I made friends in line. I was done and in the car by 7:45 or so. Now I need a nap, but I'm all hyped up on chocolate!!
P.S. Jan Tink is a fellow stamper/blogger who loves and talks about chocolate all the time.
I promise I will post some stamping projects soon. Just had a few other happenings in my life lately.
Friday, January 29, 2010
Tuesday, January 26, 2010
Nursing Honor Guard
One of my coworkers has been working on making this nursing honor guard happen. I was proud to be a part of this Mon evening at the funeral of a nurse that I had worked with over 20 years ago. 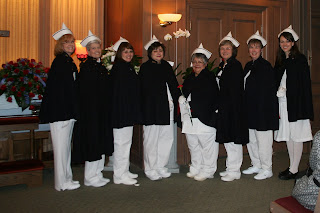

Wednesday, January 20, 2010
Trip to the Science center
 I love this pic of Ari and Dylan in the toddler play area behind blue glass. I took pictures of all the kids, but that's too many to post.
  Papa and his girls in the planetarium before the show-pretending to sleep since they were laying on the floor.
 The whole crew playing in the water. Left to right is: Abi, Chad, Dylan, Mady, Ari, Emmy, Ang, and Taylor. They were making a dam to create electric energy with the water. Or at least that was the intended purpose of this activity.
We all had a lot of fun with the many activities thay had to offer. We found out at the "different genes" booth that Mady can roll her stomach (you should see that video-we were laughing so hard!!!), Taylor can roll her tongue, several of us can do fun things with the spacing of our fingers, etc. We were there 3 hours and the kids would have stayed 3 more I think. Then all the grandchildren came home with us to spend the night and go to church the next morning. Thank goodness Ali and Bryan were home by then to cook supper and help entertain them. Grandma and Grandpa were already tired.
Scallop envelope die boxes


 I have seen people make these boxes from the bigshot scalloped envelope die, but had never made one. The red one on top is the one we made for club on Sat. I saw this one and really liked it, http://outsidetheboxinsidethelines.blogspot.com/2010/01/scalloped-envelope-box.html so made my own version. I used the new sending love specialty paper that has a glittery shimmer on one side of each page. We added the new chocolate chip 1/4" epoxy brads and a choc ribbon. It only uses 2 of the envelopes and I cut the bottom at 1/2". I was able to get 3 boxes out of 1 sheet of 12x12 card stock. The small oval punch was used to make the top handle.
 The navy one on the left is what I am making for my daughter's wedding favors. Their colors are navy and silver. She kept telling me that she didn't want any table favors, just put kisses on the table. I had still been trying to come up with an idea so when I saw this box, I knew that was it!! In order to put kisses in the box, I had to make the bottom 1" wide. I made this and showed it to her and her fiance and they LOVED it. I told her that she was not going to deprive me of doing this, but now what have I gotten myself into?!? 200+ of these will take a little bit of time!!! I made the paper shred for this one, but picked some white up at Dollar Tree for the rest. Anyone want to come play?
The striped basket next to the red one is made with last years Sale-A-Bration designer paper. I cut 4 envelopes, but only need the tab on one side to glue each together. This would be a cute Easter basket. The bottom pic is a close up of the front of the box with a scalloped oval. I had seen the tutorial here (thanks Jan)http://stampspaperscissors.typepad.com/stamps_paper_scissors/2009/03/a-tisket-a-tasket.html but hadn't tried it until now. Really not hard at all and a fun addition to any project.
The one made with razzleberry lemonade dsp is 2 envelopes with the bottom cut at 1". I used a strip of 1x12" paper for the sides and handle. 2-3 of the 3x3" love notes fit inside just perfectly.
Saturday, January 16, 2010
Valentine easel card
 I challenged my stamp club gals to make a valentine card for our swap. This is the one I made using some new toys. I used the very vintage wheel, new scallop edge punch from SAB, whimsical words for the sentiment, and the heart punch that I already had. I used melon mambo with going grey and basic grey and made an easel card.
 Thursday, January 14, 2010
Inspired by nature chalkboard technique
 I received this card front as a swap sometime in the past year or so, but don't know who to credit, so if it's yours-let me know. I really loved the idea and colors. I made it into a full card by cutting the layers down and mounting it on handsome hunter. I used a piece of so saffron on the inside and stamped the coneflower on it with white ink-no pic :(. This is the card we will be making this Sat for our technique card. Chalkboard is stamping with white ink on dark cardstock then coloring with watercolor pencils, pastels, or watercolor crayons. This card is finished off by running it through the crimper twice in opposite directions to give it wonderful texture.
Skinny Silver Tin to organize my desk

 I bought these tins to use for my hostess appreciation, then had to decide what to do with them. Not sure my gals want games or build a bear magnets, also not sure they would use an accordian scrapbook. So I thought about what I would do with mine and realized I had lots of misc items on my desk: leftover die cuts and punched shapes, buttons, patterns, etc. Most of them were in a tupperware bowl but they were all spilling out. Now they all fit in one place and I will know where to look. I hope my gals like this idea. I used the scallop square bigshot die for the front and cut holes for the ribbon with the crop a dile. The blue piece used the new scallop trim corner punch-definitely a learning curve there:(. I die cut some medium weight chipboard with my initial and covered it with woodgrain wallpaper also die cut.
Thursday, January 7, 2010
Fish card made with ornament punch
 This is another punch art card that I had seen, and finally got around to making. The body of the fish is the ornament punch. I used the eyelet border punch on the turquoise and pink cardstock then punched with the ornament punch for the fancy layer. I used the 5 petal punch for the fins and tail fins. Rhinestone brads made the eyes and I used a retired flower punch for the lips. The grass is stamped with the Inspired by Nature grass stamp and I finished it off with punched 1/4" circle bubbles.
 Sesame Street Punch Art
 Once a month I attend a stamp club at Urbandale Library. It is not associated with Stampin'Up!, but several of my stamp club members attend and others use some SU products. We take turns teaching new techniques, folds, ideas, etc. Next month I am teaching punch art, so I'm starting to make an album with ideas. I've always wanted to make one of these cards, but finally took the plunge. The photo is not the best as I played with the sizing and got it too small then enlarged it. (of course, I already had deleted it from my camera card) Watch for other punch art ideas coming soon.
 My Occasions Mini Catalog Order
 My order arrived Wed 1/13 and I was so excited I took a picture of all of my goodies!!!
Ok, I've had so much fun poring over the new mini and SAB catalogs. I finally placed my first order. More than some, but not as much as many other demonstrators! I'll give you a clue-it was enough to receive hostess benefits. There are so many wonderful choices....... I'm excited to try our NEW clear stamp sets that are still made with our most wonderful red rubber!!! And the new punches that fold flat. My stamp club members will get to play with new toys on the 16th.
Wednesday, January 6, 2010
For All You Do Card
 Inside view of card
 I got several new stamp sets recently that hadn't seen any ink. (gasp!) I used For All You Do with the cottage wall DSP colors of olive and razzleberry with a pale plum cardstock base. The vase is the ornament punch with the bottom cut off to become a vase. I "kissed" the polka dot stamp with razzleberry ink onto the butterfly already inked with pale plum and cut it out. I wanted the inside sentiment to stand out so I stamped it onto white cardstock and punched with the curly label punch. It still needed more, so I cut a piece of olive with the movers and shapers big shot die that has the curly label shape that I placed around the white punch.
 Cheep Talk Easel Card
 Sorry, the photo is a bit blurry, but I just wanted you to see the side view.
 This type of card is so easy to make, but fun to display. Just choose any size card and fold the top of the card in half. Attach the front panel of the card just to the bottom half. Use a button, large brad, or mount the inside saying with dimensionals to keep the card front standing. I got the stamp set cheep talk and wanted to play and this is what I came up with. I used crushed curry textured cardstock for the card base. An easy yet inexpensive way to add interest is to layer punched shapes. I used the 1 3/8" circle punch in turquoise, designer label punch in cocoa, modern label punch in curry, and small oval punch in white. All of those pieces were scraps. I think I will add some piercing to the top of the turquoise layer.
Monday, January 4, 2010
SALE-A-BRATION IS HERE!!
This is my 8th year of SAB and this is the BEST ever. Not only has Stampin'Up! kept the same basic premise of a stamp set FREE with every $50 (no price hike here), but they have sweetened the pot this year by offering FREE any stamp set valued at $15.95 or less from the Idea Book and Catalog in addition to the exclusive sets in the SAB mini catalog!!! So many choices... See SAB brochure in sidebar. Click on it to view online.
Also:
Hostesses: Receive a free Sale-A-Bration product for every $300 in workshop sales*, in addition to our regular hostess benefits.
*Note: Online orders do not qualify.
Recruits: Choose any retail stamp set (valued up to $47.95) from the current catalogs when signing up during the promotion. Plus, get 15 percent off your Starter Kit (Standard or Digital+)!
Starter Kit Regular Price Sale-A-Bration Price (15% off)
Standard Starter Kit
$199 $169
Digital+ Starter Kit
$185 $157
The Stampin' Memories Add-On can be added to these kits, but will not be discounted.
Subscribe to:
Posts (Atom)