Saturday, May 22, 2010

Elements of Style card


This is another card I made while playing with this new set from the Summer mini catalog. I saw one similar in a gallery or blog somewhere, but not sure who made it. I did make several changes, so it's really mine. This is a very versatile set. Buy it in May and get FREE designer brads. I used Rich Razzlberry ink and card base. I mounted the stamped image on black and added a vanilla designer label frame using the razzleberry ribbon.

Spotlighting technique


I got the new Elements of Style stamp set from the Summer mini catalog and wanted to play with it, so I used it with spotlighting for our club technique. I made the blue one first, but stamped the image many times to get the rectangular piece to line up with the image straight up and down.
So I made the pink one for our club card even though I liked the blue better. I do like the "ruby-throated" hummingbird on the pink card though. I inked the hummingbird with gable green marker, and added the throat with pin passion, then outlined the bird with glorious green and cut it out.

Wednesday, April 21, 2010

Cards made by my clubmembers

I encourage my ladies bring a card to swap. It is optional and I often give them a specific project or category, but this month I just said bring a card. Most of them use mostly SU, but I do not make that a requirement.

made by Joy
made by Marilyn
made by Jackie
made by Marlene

Tuesday, April 20, 2010

Anniversary cards


I made the things I love card for my husband. Of course the inside says "but most of all you". He told me that he wanted to make a card for me. He chose the stamps, colors, and the idea of tearing the edges and did it all by himself! I personally would have restamped the sentiment and layered it, but it is special to me just the way it is because he took the time to make it!


Monday, April 19, 2010

White on White


I have seen several cards made that are all white, so I don't know who to credit for this. I took a basic idea and added my own spin. I haven't seen any with the 2 step bird. I used all SU embossing foleders: perfect polka dots, manhattan flower, and elegant bouquet. I also used the butterfly embosslit, 2 step bird punch, pinking hearts border punch, and the 5 petal flower punch. Other accessories are the white 5/8" jumbo brads and white organza ribbon. It took one sheet of cardstock to make the entire card. I added the largest butterfly to the inside. This would be an elegant card for a wedding, but I am going to send it to my mom for mother's day. I don't think she reads my blog!

Monday, April 12, 2010

Z fold butterfly card


I belong to a group of stampers that meet once a month at Urbandale Library. Anne taught us how to make this butterfly card. It is all Stampin'Up!, but uses retired Parisian Breeze specialty DSP. The technique to make the butterfly cutout is to fold the front of the cardstock in half then center on the butterfly and fold it out flat. Put the cutting pad only to the fold and run through the Bigshot. Voila, it cuts only half of the butterfly. We then used the perfect polka dots folder on only the folded part to add the dots. Add butterflies and embellish inside and out. What a fun card. I tried it with the top note die as well. Watch for a card using that.

Sunday, April 11, 2010

Color Renovation

Click on Buttons on sidebar to see pdf of new and retiring colors.

Stampin'Up! recently announced COLOR changes that will occur with the new catalog July 1st. They have been working on this for 2 years now and are giving us a chance to plan ahead. I have heard about mixed feelings and admit that I am sad to see a few favorite colors (ballet blue, green galore) go, but after the initial shock, I am very excited!! I hope you will be as excited as well. Stampin'Up! works hard to keep up with trends and has given us the new trendy colors for the last several years with "In Colors". Some of those "In Colors" became your personal favorites and you were sad to see them go. WELL- 10 of them will be part of the new color line (squeal of delight)!! Melon Mambo, Rich Razzleberry, and Soft Suede from the current in colors will stay and returning are: Pacific Point, Tangerine Tango, Pink Pirouette, Riding Hood Red, Wild Wasabi, River Rock, and Baja Breeze. There will be 5 NEW colors added to the permanent color line and there will be 5 more "In Colors" introduced as well. There will be a total of 40 permanent colors with 25 carryover colors. There will be four color families: Brights, Regals, Subtles, and Neutrals.

Here is a list of the retiring colors, so get them while they are still available.
Going Gray-Neutrals
Basic Brown-Neutrals
Glorious Green-Bold Brights
Green Galore-Bold Brights
Gable Green-Bold Brights
Yoyo Yellow-Bold Brights
Only Orange-Bold Brights
Pink Passion-Bold Brights
Pixie Pink-Bold Brights
Orchid Opulence-Bold Brights
Lovely Lilac-Bold Brights
Brilliant Blue-Bold Brights
Close to Cocoa-Earth Elements
Creamy Caramel-Earth Elements
Really Rust-Earth Elements
Ruby Red-Earth Elements
Cameo Coral-Earth Elements
Summer Sun-Earth Elements
Bordering Blue-Rich Regals
Brocade Blue-Rich Regals
Ballet Blue-Rich Regals
Taken with Teal-Rich Regals
Handsome Hunter-Rich Regals
Pale Plum-Soft Subtles
Blush Blossom-Soft Subtles
Apricot Appeal-Soft Subtles
Barely Banana-Soft Subtles
Mellow Moss-Soft Subtles
Sage Shadow-Soft Subtles
Almost Amethyst-Soft Subtles
Lavender Lace-Soft Subtles
Dusty Durango-’09 in-color
Crushed Curry-’09 in-color
Bermuda Bay-’09 in-color

Wednesday, March 31, 2010

Wedding Story

Here's some photos


Well the wedding (March 20th) that we have been planning for almost 15 mos is over! It went off with only a minor hitch: the 4 yr old flower girl did not walk the aisle. We thought it would be the 2 yr old ring bearer who wouldn't walk, but in the end he did and she didn't. Oh well at least we have pictures. Then there was the snow Fri night:(Thank goodness the roads were clear by late Sat morning). We only missed a few out of town guests due to weather. All our girls were in the wedding as were all of the grandchildren. My parents flew in from Pa and my father performed the ceremony. It was all so beautiful. Bryan, the groom, said everything looked so nice, you couldn't tell that it was a budget wedding. My good friend Alison did the flowers and our music minister/home school academy leader spent many long hours working with us to make the church and reception hall shine. I got 220 table favors made with the help of my daughter, the bride and my husband. I am proud of my accomplishment of using My Digital Studio to make the weding slideshow. I did it all by myself!!!

We worked on decorating the church and reception hall Thur, Fri, and final touches Sat morning, then took things down Sat evening, Sun afternoon, and finally finished everything Mon afternoon. To top it all off, I went back to work Tues after being off for 12 weeks. I think I am finally recuperated.

The honeymooners spent a week in sunny Florida, Daytona Beach, and are home and back to work today. But they have no place to live except a bedroom in our home. We are praying that the closing on their home will happen soon.

Over the Hill Birthday Card

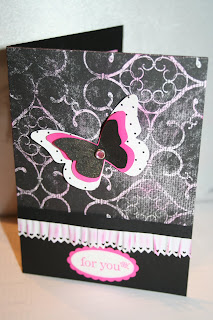
My sister-in-law turned 50 this month, so I wanted a black card that was still elegant. This is what I came up with. I used the day and night dsp from the holiday mini and sponged pink passion over it. I made a faux lace panel with the pinking hearts border punch and the crimper. And I used the bigshot butterfly die and embosslit.


Sunday, March 14, 2010

Wedding Countdown

Our #3/last daughter is getting married Sat the 20th. I'm printing wedding programs now, need to finish table favors, and scan the last few photos in for the slide show. But at least I have the use of both hands now-no more casts, splints, etc. I got my hair cut and colored yesterday. I feel like we are ready, but am sure there will be last minute fiascos. I'll add a picture of the table favors soon.

Birdhouse Card


While I was at my friend Peggy's in Az last month, we made this birdhouse card. She had seen the idea-not sure who to credit for that-using razzleberry lemonade designer paper for the house. We decided to make it with very vanilla so that the bird is more of the focus. But it was too blah and just needed something. We finally decided on using the sanded background to make it look more like a wooden house. Below is the finished card.

Saturday, March 13, 2010

More punch art cards

These are some cards that my friend Peggy made while I was at her house last month.

This is made with the scallop circle bigshot die and retired designer paper. The purse is the round tab punch.

Fun little lamb card made using the scallop circle punch and several flower punchs.

This is the car card with photo below of pieces used to make it. Some of the circles are cut and/or partially used.

Sunday, March 7, 2010

Birthday cards for missionaries

Our ladies group at church sends cards to our female missionaries for their birthdays. I plan and prep cards for the group to make. We had approx 15 ladies stamping. Here are the finished projects! Some use cardstock other than Stampin'Up!, but all use current SU stamps, and ink.


Friday, February 19, 2010

Out of town

I am in Az visiting my stamping friend Peggy. We have made some new cards,so I will have some things to post when I get home. My husband arrives this afternoon and we will be in Sedona for a week. Check back the first of March.

Monday, February 8, 2010

Alexis and Bryan MDS collage page

We are down to 40 days until the wedding, so I decided to try my hand at a 12x12 collage page with My Digital Studio. I really like how this turned out.

Card from a friend

I rceieved this card in the mail from Diane Doro to let me know she was thinking of me after my fall. Get this, she herself has a broken wrist, had surgey, and is in a cast!!! Thank you Diane:)
The card uses the new Sweet Pea DSP, the Extra large 2-step bird punch, Tiny tags stamp set, and the Medium jewelry tag punch all from the Occasons Mini Catalog. How cute is that and other than the think work a quick card. Now the work is already done for you, so try this for yourself!

Tuesday, February 2, 2010

MDS page that I made in October

Click on photo to enlarge. This is a 12x12 page that I made in October when I first got My Digital Studio. It is of our grandson Dylan when we were at Adventureland. I am just figuring out how to save and be able to show you what I made. I love the central photo when I caught him looking through the fence at the railroad while we were waiting for the train.

I DID IT! I made my own blog header.

I have seen many people making their own blog headers with My Digital Studio and I wanted to as well, but wasn't quite sure how to do so. I need to thank Tara Kieninger and her blog http://www.firefliesandflutterbyes.com/ for the directions to make my own. This one took me about 30 min to do, so you may be seeing different ones on occasion.

Haitian Disaster Relief

On January 12, 2010 a magnitude 7.0 earthquake struck Haiti, leaving in its wake devastation so overwhelming that the Haitian people and their leaders can only look for help from the outside to cope.

From now until February 28, 2010, $2 from every I {Heart} Hearts stamp set sold will be donated to the American Red Cross’ Haiti Relief and Development Fund. The Red Cross is already well-established in Haiti, and this money will be used to provide immediate relief and long-term support through supplies, technical assistance and other support to help those in need.
Product Name Item # Price

I {Heart} Hearts –118571 $18.95
clear-mount (block D recommended)

I {Heart} Hearts –117010 $26.95
wood-mount


Monday, February 1, 2010

Best excuse I could come up with for no new projects!!


I was so excited to play with my new toys on Sat and have some new projects to share, then I broke a bone in my right hand on Fri night. So I now have a splint on my right hand and a cast on my left hand-from my thumb joint replacement surgery. Alas, I can't even think about papercrafting of any sort for about 2 weeks. I need to work on the table favors for my daughter's wedding that is in 46 days. I'll be in overdrive the last 4 weeks before the wedding.

Friday, January 29, 2010

Chocolate Breakfast anyone? Eat your heart out Jan Tink!!!

Our local radio station has had a chocolate breakfast for the last 6 years. It is from 5-9 AM!! I think I have been to 5 of them. My friends couldn't go this year so I decided to go by myself. Well this morning I woke up at 4 am and thought, I don't need that much chocolate, I don't want to get up this early, I won't waste the gas to go, etc. But common sense kicked in and said "It's once a year, what are you thinking? of course you'll go!!!" So I took my darling husband to work and went on to the chocolate breakfast. I arrived at 6:10, waited in line for about 35 min and had my first taste of many chocolate items by 6:45. There were 34 vendors there, all with samples of their wares-ice cream, cookies, cake, popcorn, candy, jelly, coffee, wine and more I'm sure. I don't drink wine or coffee, so I skipped those booths. By the end, I couldn't stuff my mouth fast enough, so I have a few goodies for later. I took pics, but only with my phone and I don't have a card yet to post them. They had Richie Lee-a 50's band/group there singing. He had a red sports coat and red shoes! And a really good voice, very enjoyable way to wait in line. Of course, I've never met a stranger, so I made friends in line. I was done and in the car by 7:45 or so. Now I need a nap, but I'm all hyped up on chocolate!!

P.S. Jan Tink is a fellow stamper/blogger who loves and talks about chocolate all the time.

I promise I will post some stamping projects soon. Just had a few other happenings in my life lately.

Tuesday, January 26, 2010

Nursing Honor Guard

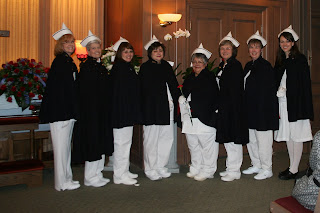
One of my coworkers has been working on making this nursing honor guard happen. I was proud to be a part of this Mon evening at the funeral of a nurse that I had worked with over 20 years ago.

Wednesday, January 20, 2010

Trip to the Science center

I love this pic of Ari and Dylan in the toddler play area behind blue glass. I took pictures of all the kids, but that's too many to post.
Papa and his girls in the planetarium before the show-pretending to sleep since they were laying on the floor.

The whole crew playing in the water. Left to right is: Abi, Chad, Dylan, Mady, Ari, Emmy, Ang, and Taylor. They were making a dam to create electric energy with the water. Or at least that was the intended purpose of this activity.

We all had a lot of fun with the many activities thay had to offer. We found out at the "different genes" booth that Mady can roll her stomach (you should see that video-we were laughing so hard!!!), Taylor can roll her tongue, several of us can do fun things with the spacing of our fingers, etc. We were there 3 hours and the kids would have stayed 3 more I think. Then all the grandchildren came home with us to spend the night and go to church the next morning. Thank goodness Ali and Bryan were home by then to cook supper and help entertain them. Grandma and Grandpa were already tired.


Scallop envelope die boxes


I have seen people make these boxes from the bigshot scalloped envelope die, but had never made one. The red one on top is the one we made for club on Sat. I saw this one and really liked it, http://outsidetheboxinsidethelines.blogspot.com/2010/01/scalloped-envelope-box.html so made my own version. I used the new sending love specialty paper that has a glittery shimmer on one side of each page. We added the new chocolate chip 1/4" epoxy brads and a choc ribbon. It only uses 2 of the envelopes and I cut the bottom at 1/2". I was able to get 3 boxes out of 1 sheet of 12x12 card stock. The small oval punch was used to make the top handle.

The navy one on the left is what I am making for my daughter's wedding favors. Their colors are navy and silver. She kept telling me that she didn't want any table favors, just put kisses on the table. I had still been trying to come up with an idea so when I saw this box, I knew that was it!! In order to put kisses in the box, I had to make the bottom 1" wide. I made this and showed it to her and her fiance and they LOVED it. I told her that she was not going to deprive me of doing this, but now what have I gotten myself into?!? 200+ of these will take a little bit of time!!! I made the paper shred for this one, but picked some white up at Dollar Tree for the rest. Anyone want to come play?

The striped basket next to the red one is made with last years Sale-A-Bration designer paper. I cut 4 envelopes, but only need the tab on one side to glue each together. This would be a cute Easter basket. The bottom pic is a close up of the front of the box with a scalloped oval. I had seen the tutorial here (thanks Jan)http://stampspaperscissors.typepad.com/stamps_paper_scissors/2009/03/a-tisket-a-tasket.html but hadn't tried it until now. Really not hard at all and a fun addition to any project.

The one made with razzleberry lemonade dsp is 2 envelopes with the bottom cut at 1". I used a strip of 1x12" paper for the sides and handle. 2-3 of the 3x3" love notes fit inside just perfectly.


Saturday, January 16, 2010

Valentine easel card

I challenged my stamp club gals to make a valentine card for our swap. This is the one I made using some new toys. I used the very vintage wheel, new scallop edge punch from SAB, whimsical words for the sentiment, and the heart punch that I already had. I used melon mambo with going grey and basic grey and made an easel card.

Thursday, January 14, 2010

Inspired by nature chalkboard technique

I received this card front as a swap sometime in the past year or so, but don't know who to credit, so if it's yours-let me know. I really loved the idea and colors. I made it into a full card by cutting the layers down and mounting it on handsome hunter. I used a piece of so saffron on the inside and stamped the coneflower on it with white ink-no pic :(. This is the card we will be making this Sat for our technique card. Chalkboard is stamping with white ink on dark cardstock then coloring with watercolor pencils, pastels, or watercolor crayons. This card is finished off by running it through the crimper twice in opposite directions to give it wonderful texture.

Skinny Silver Tin to organize my desk


I bought these tins to use for my hostess appreciation, then had to decide what to do with them. Not sure my gals want games or build a bear magnets, also not sure they would use an accordian scrapbook. So I thought about what I would do with mine and realized I had lots of misc items on my desk: leftover die cuts and punched shapes, buttons, patterns, etc. Most of them were in a tupperware bowl but they were all spilling out. Now they all fit in one place and I will know where to look. I hope my gals like this idea. I used the scallop square bigshot die for the front and cut holes for the ribbon with the crop a dile. The blue piece used the new scallop trim corner punch-definitely a learning curve there:(. I die cut some medium weight chipboard with my initial and covered it with woodgrain wallpaper also die cut.

Thursday, January 7, 2010

Fish card made with ornament punch

This is another punch art card that I had seen, and finally got around to making. The body of the fish is the ornament punch. I used the eyelet border punch on the turquoise and pink cardstock then punched with the ornament punch for the fancy layer. I used the 5 petal punch for the fins and tail fins. Rhinestone brads made the eyes and I used a retired flower punch for the lips. The grass is stamped with the Inspired by Nature grass stamp and I finished it off with punched 1/4" circle bubbles.

Sesame Street Punch Art

Once a month I attend a stamp club at Urbandale Library. It is not associated with Stampin'Up!, but several of my stamp club members attend and others use some SU products. We take turns teaching new techniques, folds, ideas, etc. Next month I am teaching punch art, so I'm starting to make an album with ideas. I've always wanted to make one of these cards, but finally took the plunge. The photo is not the best as I played with the sizing and got it too small then enlarged it. (of course, I already had deleted it from my camera card) Watch for other punch art ideas coming soon.

My Occasions Mini Catalog Order

My order arrived Wed 1/13 and I was so excited I took a picture of all of my goodies!!!

Ok, I've had so much fun poring over the new mini and SAB catalogs. I finally placed my first order. More than some, but not as much as many other demonstrators! I'll give you a clue-it was enough to receive hostess benefits. There are so many wonderful choices....... I'm excited to try our NEW clear stamp sets that are still made with our most wonderful red rubber!!! And the new punches that fold flat. My stamp club members will get to play with new toys on the 16th.

Wednesday, January 6, 2010

For All You Do Card

Inside view of card
I got several new stamp sets recently that hadn't seen any ink. (gasp!) I used For All You Do with the cottage wall DSP colors of olive and razzleberry with a pale plum cardstock base. The vase is the ornament punch with the bottom cut off to become a vase. I "kissed" the polka dot stamp with razzleberry ink onto the butterfly already inked with pale plum and cut it out. I wanted the inside sentiment to stand out so I stamped it onto white cardstock and punched with the curly label punch. It still needed more, so I cut a piece of olive with the movers and shapers big shot die that has the curly label shape that I placed around the white punch.

Cheep Talk Easel Card

Sorry, the photo is a bit blurry, but I just wanted you to see the side view.
This type of card is so easy to make, but fun to display. Just choose any size card and fold the top of the card in half. Attach the front panel of the card just to the bottom half. Use a button, large brad, or mount the inside saying with dimensionals to keep the card front standing. I got the stamp set cheep talk and wanted to play and this is what I came up with. I used crushed curry textured cardstock for the card base. An easy yet inexpensive way to add interest is to layer punched shapes. I used the 1 3/8" circle punch in turquoise, designer label punch in cocoa, modern label punch in curry, and small oval punch in white. All of those pieces were scraps. I think I will add some piercing to the top of the turquoise layer.

Monday, January 4, 2010

SALE-A-BRATION IS HERE!!

This is my 8th year of SAB and this is the BEST ever. Not only has Stampin'Up! kept the same basic premise of a stamp set FREE with every $50 (no price hike here), but they have sweetened the pot this year by offering FREE any stamp set valued at $15.95 or less from the Idea Book and Catalog in addition to the exclusive sets in the SAB mini catalog!!! So many choices... See SAB brochure in sidebar. Click on it to view online.

Also:
Hostesses: Receive a free Sale-A-Bration product for every $300 in workshop sales*, in addition to our regular hostess benefits.
*Note: Online orders do not qualify.
Recruits: Choose any retail stamp set (valued up to $47.95) from the current catalogs when signing up during the promotion. Plus, get 15 percent off your Starter Kit (Standard or Digital+)!


Starter Kit Regular Price Sale-A-Bration Price (15% off)
Standard Starter Kit
$199 $169
Digital+ Starter Kit
$185 $157

The Stampin' Memories Add-On can be added to these kits, but will not be discounted.